Monday 5 September 2011

Time Flies!

Well well well, doesn't time fly when your having fun?

Just checked my blog and realised that I've been quiet since march and I can't quite believe where the time has gone. Apart from a trip to Jordan to visit my bro @johnjosephryan and a few weekend jaunts i've been beavering away in the workshop. I've also been playing with my nemesis aka the computer and have come up with a website which you can find here please come and visit and let me know what you think.


My philosophy of transforming used wood and materials into new things and saving them from the indignity of landfill continues apace and on a recent trip to visit my good friends in Newcastle I came across my latest muse. Some left over slats from some venetian blinds that were destined for the fire were kindly bestowed on me and, if i'm honest, i thought they were a bridge too far even for me! Alas they weren't, I got out the glue pot, some clothes pegs and the creative juices and began to play.


Luckily for me I had just been asked to make a letter rack for a regular customer and was given then brief of creative and delicate. Luckily for them things turned out well! A bit of bending, a bit of gluing and then some delicate sanding and cutting and I thought I'd cracked it. For a little flourish I added a piece of stained glass to the end panel to catch the light flooding in the front door. All there is left to do is to deliver and fit it.......I hope she likes it!


Sustainably Onwards


The Woodfashioner


Sunday 20 March 2011

Margaret, keeper of the Herbs

Hello all.

I know its been a while but I'm still here! I've been busy working on some new designs, reclaiming some wood and generally fashioning around. Here's a few pics and a little description of what I've been doing most recently.
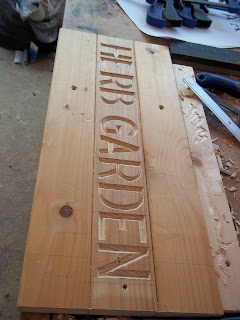
As you can see I've been doing a bit of letter carving and you can probably gather that this panel is for a Herb Garden! This panel was glued up from some pine that I salvaged from an tired looking old bed, it's now looking forward to a new life cradling some fragrant herbs.


Here is the herb garden all put together and sitting up on my bench. The legs were cut from some old stud wall timber that someone had deemed surplus to requirements. I think they've got much more to give to the world than being dumped in landfill or minced up for chipboard!


A few coats of paint and a bit of black plastic sheeting, unfortunately this isn't reclaimed. It was, instead, liberated from the garden centre in exchange for some of my hard gained cash! There is some unseen physics going on under that black plastic, the base of the box is sloped towards the back and there are some channels cut into it to drain the water away. This will make sure the whole thing doesn't hold too much moisture and ruin your herbs.....mmmmm I can taste that rosemary!


Here she is in all her glory, think I'll call her Margaret.
She measures approx 1000mm high x 900mm long x 560mm wide. Wonderful statistics I'm sure you'll agree? There's plenty of room to grow a good variety of herbs and maybe even some small veggies. Keep it just outside the kitchen door, on the balcony, roof terrace, wherever you can fit it. Happy growing!


Sustainably onwards,

The Woodfashioner

Monday 31 January 2011

Reclaimed wood laptop table.

Here is my latest creation! Laptop users across the globe have long suffered from what is known as 'hot leg syndrome' (i just made that up) but no more shall they slowly cook whilst using their computers!
I have always liked the idea of a bed tray for food but as I spend more time in bed on my computer than eating I thought I'd have a bash at making a laptop table. Maybe the next one will have a cup holder.
When it comes to the computer:comfort in bed ratio then its all about angles so I tried to make my table as adjustable as possible. So the front legs slide up and down and are articulated so you can create the height and angle your heart desires.


Here it is being beautifully modeled by my brother, he seems to like it quite high but i prefer it to be lower and with a bit more pitch on it.
The top is 21"x15" so will easily accommodate most laptops with space for you wrists to rest and a cheeky mouse on the side.
I got the wood from a local renovation where someone was having their floor replaced, although I did have to buy the dowel that holds the legs together as I'd run out of old broom handle! Have to go hunting for another one.


Gratuitous detail shot.
For nothing more than personal satisfaction!


There isn't always space in the bedroom for another table or piece of furniture so this nifty little table folds flat for easy storage under the bed or, top of the wardrobe or wherever you care to keep it.


So I leave the judgement to you Goddess Internet and all who follow you.
I'd love to hear from you about your thoughts, suggestions, improvements that could be made, how much you'd pay and any other banter you may have concerning this table and or anything else that you'd like to share.
I'd love to hear from you so don't hesitate to get in touch.


Sustainably onwards,

The Woodfashioner

Tuesday 18 January 2011

Make your own furniture wax.

I've always wanted to make my own wood finish and so when a local beekeeper friend of mine gave me some of the fruits of her bees labour I thought I'd give it a go. I found a recipe in a dusty old book, got out mums best pans and started concocting!
So here are my two chunks of beeswax, they weigh approximately 50g each and smell like sweet sweet honey...


Just like you were melting down some chocolate place a glass bowl on top of a pan of boiling water and slowly melt the wax. It may take a little while but its best not to rush it.


After a while it will become a liquid that fills the house with a sweet honey aroma (resist temptation to drink it!). Once it is liquid it is time to add some white spirit, the ratio is 1:1, millilitres to grams so approximately 100ml. Slowly pour it in, stirring as you go whilst still on a gentle heat. If it starts to solidify instantly then crank up the temperature a little till you've added all the white spirit.


Before the mixture solidifies pour it into an old jam jar and put the lid on. It should take a couple of hours for it to cool down and harden and then it'll be ready to use.
This is a great way of using local a ingredient to simply make something useful and it has the benefit of not containing all those horrible chemicals of commercial furniture wax. Its homemade wax finishing from here on in for me!


Sustainably onwards,

The Wood Fashioner


Help keep our furniture waxed... sign the petition to save the bees: Global Bee Emergency Petition

Friday 14 January 2011

The Completion

when I left you I had just finished all the components for the bookshelf and all that was left to do was glue it together and finish it. So here goes.
With a generous helping of wood glue and the help of my trusty F clamps the bookshelf is together. I left it to go off overnight and....


.....viola! After applying a couple of coats of shop bought beeswax polish (look out for my next blog where I make my own furniture wax from local beeswax), a quick buff up and a pose for the camera and here we have it. Remember the dirty old bed slats that I started with? This is what I've transformed them into and hopefully they'll live happily ever after in their new guise.


And here it is in use, it can easily accommodate large and small books, CDs and DVDs. Please don't judge me from my choice of literature, music and film, it was simply what was close at hand!
I feel this bookshelf sums up my philosophy towards furniture perfectly. It involves the use of something that was destined for the dump being turned into something supremely practical and also rather handsome (if I may say so myself). If you like what you see then keep checking this blog for more in the same vein.


Sustainably onwards,

The Wood Fashioner

Tuesday 11 January 2011

The transformation continues!


So, where were we? My last post finished with me gluing up the poor old bed slats into a wider board. Which, after a bit of sand looks like this! Now I have a board which is approx 36" long and 6" wide, a lot more useful than the narrow dirty planks that I started with.


Next step is to get creative with the jigsaw and router! First I made a template for the shape I wanted out of a piece of scrap, then used the router with a template cutter to copy the shape onto the bits I'd chopped out of my glued up board. As you can see I managed to get six pieces out of the glued up board so this will be enough to make 3 small bookshelves. The shape I've come up with means that the shelves will be stackable should you wish to use them for other purposes other than books ie. spices, herbs etc..


Another grimey old slat, which will form the back and base, and we're on our way to nearly finishing the bookshelf. A sand up and quick chop in half and we suddenly have a back and a bottom for the shelf!


So here we have all the pieces that will make up this wonder of wood work! The ends have had mortices cut into them that match the profile of the bed slats.


...and with a swing of the mallet and a prayer offered up to the gods of tight joints we have a mini bookshelf! Cutting the mortices at the correct angle along a curved edge was somewhat of a challenge but, thankfully, it all lines up and fits snugly.
Look out for the final installment of this epic journey for these tired old bed slats where I will glue it together, put on a suitable finish and laden with books!


Sustainably onwards,

The Woodfashioner

Thursday 6 January 2011

Making something from.....something else!

Hello World,

Just found a pile of old bed slats that look like they've been lying in someones garden for a good long while. I reckon they've still got some life in them yet so I'm going to turn them into something brand new!
I've had an idea for a supremely useful, no home could be without, absolutely life changing......mini bookshelf. This pine should be perfect for the job. It may not be that old, probably 20-30yrs, but it was on its way to the wood pile in the sky (the council incinerator) so I'm going to give it a second chance.
I'm going to use this post and a couple of subsequent ones to make a photo diary of the progress of my mini bookshelf. First job was to brush off the cob webs and months/years of dirt!


The rounded edges need to be cut off ready for the boards to be glued together. With the edges are all trimmed and square they are ready to be glued up and continue on their journey from scrap to uber desirable household commodity!


Ta Da! A bit of glue and some cramping action and the boards are glued together. These boards are going to form the sides of the bookshelf and i'll use some of the other slats for the shelves.
I leave the boards to dry overnight, especially during the winter when everything takes longer. So tomorrow they'll be ready for turning into their new found glory.
Keep checking the blog for the next post and the next leg on the journey of the forgotten bed slats.


Sustainably onwards,

The Woodfashioner.